Make a Cute Amigurumi Panda with Simple Crochet Tips
Ever thought of turning a ball of yarn into a cute friend? Making your own amigurumi panda is a fun project. It turns simple loops into a beautiful piece of art. This guide will teach you easy steps that anyone can follow.

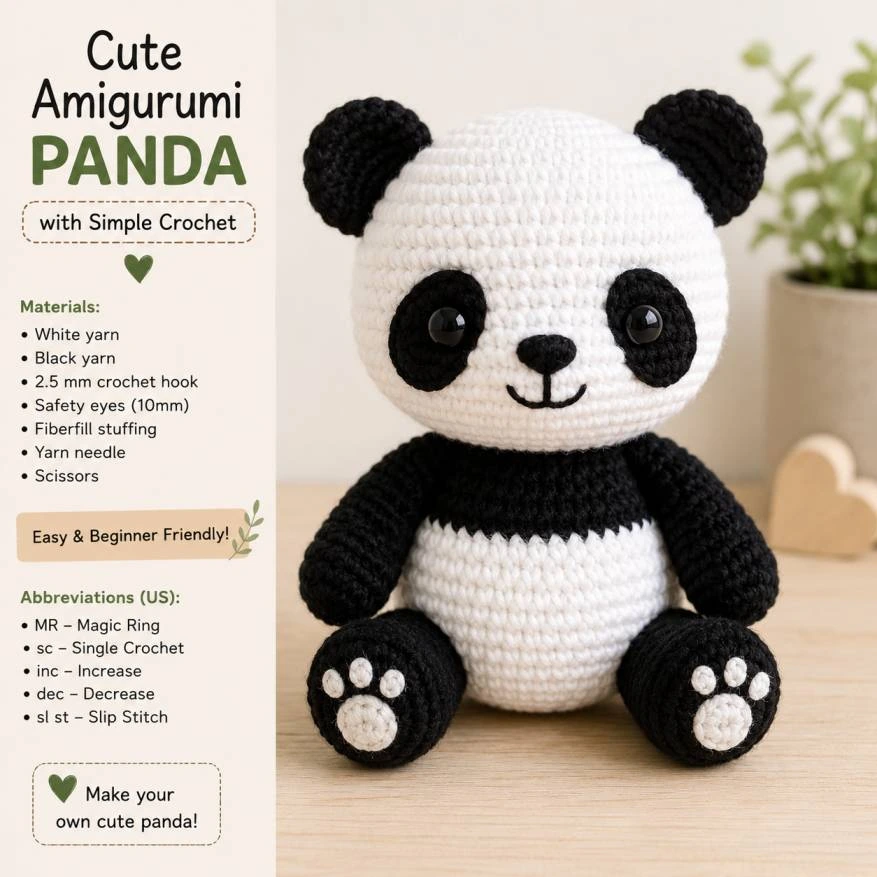
Your finished panda will have a perfectly rounded body, a clear head, and cute black ears. We’ll add short arms and strong legs so it can sit up on any shelf. Choosing the right materials is key, so we’ll show you how to pick the best yarn and practice basic stitches.
Next, we’ll cover putting it all together and adding embroidery details. You’ll also learn important safety checks to keep your amigurumi panda safe for years. By the end, you’ll know how to make a professional-looking toy. You can show it off or give it as a gift to a friend.
Gather Materials and Learn the Basic Amigurumi Techniques
Starting a project with quality materials and basic skills is key. It makes the process enjoyable and stress-free.
Choose Yarn, Crochet Hook, Stuffing, and Finishing Supplies
Select Soft Black-and-White Yarn for a Handmade Panda Plush
For your handmade panda plush, pick a medium-weight yarn. Acrylic or cotton works well. They’re durable yet soft.
Make sure your yarn colors are bright and even. Quality yarn prevents pilling and keeps your panda looking good for a long time.
Prepare Safety Eyes, Embroidery Thread, Fiberfill, and a Tapestry Needle
You’ll need polyester fiberfill for a cuddly panda. Use plastic safety eyes for secure features.
Have a tapestry needle for sewing ends and pieces together. Use black embroidery thread for the nose and mouth details.
Understand the Stitches and Abbreviations Used in the Pattern
Practice the Magic Ring, Single Crochet, Increase, and Invisible Decrease
Amigurumi uses key stitches. The magic ring starts your work, and the single crochet makes the body dense.
Learn to increase and decrease without gaps. Practice on scrap yarn before your main project.
Learn How to Crochet in Continuous Rounds Without Losing Your Place
Patterns often use continuous rounds. This creates a smooth look but can be tricky to keep track of.
Use a stitch marker at each round’s start. It helps keep your stitch count right for your handmade panda plush.
Check Gauge and Plan the Panda’s Finished Size
Check your gauge before starting. Tight stitches are crucial for stuffing to stay inside.
Adjust your hook size for a dense texture. Planning your size early helps with yarn selection for your handmade panda plush.
Crochet the Main Body of Your Amigurumi Panda
Creating the main body is the most exciting part of bringing your crochet character to life. This foundational stage of your panda toy pattern sets the stage for the entire project’s structure and charm.
Begin the White Belly and Lower Body in Continuous Rounds
Work the Magic Ring and Build the First Even Rounds
Start with a magic ring for a tight, seamless center. This method avoids unsightly holes in the base. Work your initial stitches into the ring, pulling the tail firmly to close the gap completely.
Use Stitch Markers to Track Round Starts and Maintain Consistent Tension
Working in continuous rounds can make it hard to keep track. Always place a stitch marker in the first stitch of every round. Maintaining steady tension is vital for a professional look, so keep your yarn flow smooth and even throughout the process.

Shape the Panda’s Body With Increases and Decreases
Expand the Body Smoothly for a Rounded Panda Soft Toy
To achieve that signature round shape, use systematic increases. By adding stitches at specific intervals, the fabric grows outward to create a plump, huggable form. This panda toy pattern relies on these increases to build the belly’s volume.
Insert Fiberfill Gradually Before Closing the Final Rounds
Don’t wait until the end to add your stuffing. Insert fiberfill in small amounts as you work to ensure the shape remains firm and even. This approach prevents lumpy areas and makes it much easier to reach the bottom of the body.
Adjust the Body Shape for a Plump or Petite Panda Plushie Design
You can easily customize your panda toy pattern to suit your personal style. For a plumper look, add extra increase rounds before working even. If you prefer a petite design, simply stop your increases earlier and begin your decrease rounds sooner to taper the body toward the neck.
Make the Panda’s Head, Ears, Arms, and Legs
Now, it’s time to add the details that make your project special. Each part needs patience, but the end result is worth it. You’ll have a truly professional piece.

Form the Round Head for an Adorable Stuffed Animal
Increase Evenly to Create a Smooth Face Shape
To get a perfect sphere, increase stitches evenly in each round. This avoids bumps and makes your adorable stuffed animal look soft and round. Always check your stitches to keep the shape right.
Place the Safety Eyes and Embroider the Nose Before Closing the Head
Before finishing the head, put in your safety eyes. It’s easier to secure them when the head is open. Then, embroider the nose with black yarn for a cute expression.
“The magic of amigurumi lies in the small details that transform simple yarn into a character with personality.”
— Expert Crafter
Crochet the Black Ears and Attach Them Securely
Keep Both Ears Equal in Size and Symmetrical in Position
Crochet two black circles for the ears. Make sure both are the same size by counting rows and stitches. Place them evenly to keep the look balanced.
Shape the Front and Back Legs for a Stable Sitting Pose
Stuff the Legs Firmly Enough to Support the Panda Toy
The legs are key for your toy’s stability. Stuff them firmly so the panda can sit up straight. Firm stuffing is crucial for a quality finish.
Leave Long Yarn Tails for Neat Sewing and Attachment
Always leave a long yarn tail when finishing each limb. These tails help sew the pieces securely. Using the same yarn makes your seams invisible and strong.
Make the Short Arms for a Huggable Cute Crochet Panda
Use Light Stuffing to Keep the Arms Flexible and Natural-Looking
The arms should be lightly stuffed for flexibility. This lets them hang naturally against the body of your cute crochet panda. Soft arms make the toy more huggable.
| Part | Stuffing Level | Purpose |
|---|---|---|
| Head | Medium | Softness |
| Legs | Firm | Stability |
| Arms | Light | Flexibility |
Assemble and Embroider the Panda Crochet Tutorial
The last steps of this panda crochet tutorial are about putting all parts together. This makes your plush toy look great and last long.
Attach the Head to the Body With Strong, Even Stitches
Center the Head Before Sewing to Prevent a Crooked Neck
First, place the head on the neck opening. Use pins to keep it steady. Check it’s straight from the front and sides.
Hide the Joining Yarn Tails Inside the Amigurumi Panda
After sewing, thread the yarn tail through a tapestry needle. Push it into the body and pull it out elsewhere. Then, cut the yarn close to the surface so it disappears inside.
Position the Ears, Arms, and Legs for Balanced Proportions
Pin Each Part Temporarily and Check the Panda From Every Angle
Pin the limbs before sewing them on. This lets you adjust the pose. Make sure the panda looks balanced and even.
“The beauty of handmade toys lies in the small details that give each character its own unique personality.”
Secure Limbs With Reinforced Stitches for Durable Play
Use a whip stitch or mattress stitch to attach the limbs. Reinforced stitches keep the toy together, even when it’s played with a lot.
Embroider the Eye Patches, Nose, Mouth, and Optional Details
Create Even Black Eye Patches With Satin or Surface Stitches
Make the panda’s eye patches with black embroidery floss. Use small, even stitches to keep the surface smooth.
Add Cheeks, Paw Details, or a Small Scarf Without Overloading the Design
You can add personality with pink thread for cheeks or simple lines for paws. Keep it simple to keep the look clean and classic.
Follow Safety Practices for Children’s Handmade Toys
Use Embroidered Eyes Instead of Safety Eyes for Babies and Toddlers
For young children, avoid plastic safety eyes. Use black yarn or embroidery thread for soft, stitched eyes that are safe.
Trim and Secure Every Yarn End to Reduce Loose-Part Hazards
Always check that every knot is tight and every yarn end is buried deep. A well-made toy should have no loose threads that could be pulled or swallowed.
Improve Shape, Texture, and Finish With Simple Crochet Tips
Refining your work is the final step in making a simple project into a high-quality keepsake. Even small adjustments can make a big difference in the look of your panda soft toy. This ensures it looks professional and polished.
Prevent Gaps, Lumps, and Loose Stitches in the Finished Panda
Adjust Tension and Hook Size When Stuffing Shows Through
If you see fiberfill peeking through your stitches, your tension might be too loose. Try switching to a smaller crochet hook to tighten the fabric. This change makes the surface firmer, keeping the stuffing inside.
Distribute Fiberfill in Small Amounts for a Smooth Surface
Lumpy stuffing can ruin your creation’s shape. Instead of big chunks, use small, fluffy pinches of fiberfill. Carefully mold the shape with your hands as you stuff. This ensures an even, smooth distribution throughout the body.

Correct Common Assembly and Proportion Problems
Repair Wobbly Parts and Uneven Facial Features Without Restarting Everything
If a limb feels wobbly, you don’t have to start over. Use a matching yarn tail and a tapestry needle to add extra hidden stitches. For uneven facial features, use subtle embroidery stitches to pull the fabric into place.
Resize the Panda Toy Pattern by Changing Yarn Weight Carefully
You can easily change your panda plushie design by trying different yarn weights. A thicker yarn with a larger hook makes a bigger toy. A thinner yarn makes a delicate, miniature version. Always adjust your hook size to match the new yarn weight for the best results.
Clean, Shape, and Store Your Finished Panda Soft Toy
Maintaining your finished project keeps it beautiful for years. Follow these simple steps to keep your creation in top condition:
- Spot clean gently with a damp cloth and mild soap if the surface becomes dusty.
- Reshape the limbs and head by gently squeezing and patting the fiberfill back into place.
- Store your panda plushie design in a cool, dry place away from direct sunlight to prevent fading.
- Avoid heavy pressure during storage to keep the stuffing from becoming permanently compressed.
Conclusion
Making a diy panda amigurumi is very rewarding. You now know how to turn simple yarn into a cute friend. This is all thanks to your careful stitching and shaping.
You began by getting the right materials and learning basic crochet skills. You learned how to make your amigurumi panda bear look right and feel great. This makes sure it lasts a long time and is always cuddly.
You can make your amigurumi panda your own by changing the size. A small one is great for a desk, and a big one is perfect for a child. Always make sure any decorations are safe if you’re giving it to a kid.
Show off your amigurumi panda to other crafters. It shows off your hard work and creativity. Keep trying new things to make more soft toys.
FAQ:
What is the best type of yarn for creating a handmade panda plush?
For a durable and professional-looking handmade panda plush, choose high-quality acrylic or cotton blend yarn. Lion Brand Vanna’s Choice or Red Heart Super Saver are great options. They have a wide range of black and white tones and stitch well, keeping your amigurumi panda in shape.
How do I prevent stuffing from showing through my cute crochet panda?
To keep your cute crochet panda looking neat, crochet tightly and use a smaller hook than recommended. A Clover Amour hook in 3.25mm or 3.5mm size works well. This creates dense stitches that hide the Poly-Fil fiberfill inside your adorable stuffed animal.
What are the essential stitches required for this panda toy pattern?
This panda toy pattern uses four key stitches: magic ring, single crochet, increases, and invisible decrease. Mastering the invisible decrease is crucial. It helps shape the head and body without visible bumps or gaps.
Can I customize the size of my panda plushie design?
Yes, you can adjust the size of your panda plushie design by changing yarn weight and hook size. For a big panda, use Bernat Blanket yarn with an 8mm hook. For a small one, try lace-weight yarn and a 1.5mm hook, following the same steps.
How do I make this panda soft toy safe for small children?
To make your panda soft toy safe for kids, avoid plastic safety eyes. Use black embroidery floss from DMC to stitch the eyes and nose. Make sure all limbs are securely attached and yarn tails are well-hidden in the handmade panda plush.