The Real Toll House Cookie Recipe: A Chef’s Guide for Beginners
The first time I burned a batch of chocolate chip cookies, I was seventeen, home alone, and absolutely convinced I’d followed the recipe on the back of the bag to the letter. I hadn’t. I’d rushed the butter, guessed at the oven temperature, and pulled them out a full three minutes too late. What came out of that oven looked more like hockey pucks than cookies. It took me years of working in professional kitchens to understand that this humble recipe, the one printed on every bag of Nestlé Toll House chips since 1939, is deceptively simple. Get the details right, and it’s foolproof. Skip them, and you’ll be reaching for a glass of milk to soften something that should never have needed softening in the first place.
So let’s fix that. This is the original Toll House cookie recipe, walked through step by step, with the chef-level details that actually make the difference between a flat, greasy disc and a golden, chewy cookie with crisp edges. Whether you’re baking for the first time or you’ve just never quite nailed the texture, you’re in the right place.
What you’ll walk away with:
- The original, unaltered Toll House recipe (yes, it’s still the same one from 1939)
- Exact measurements and a clear step-by-step method
- The real answer to “350 or 375 degrees?”
- How to get soft, chewy cookies instead of dry, crumbly ones
- A quick FAQ answering the questions beginners ask most
Where This Recipe Actually Comes From
Here’s something most people don’t know: the Toll House cookie wasn’t invented by a food scientist in a lab. It came from Ruth Wakefield, who ran the Toll House Inn in Massachusetts back in the 1930s. As the story goes, she was making a batch of butter drop cookies and ran out of baker’s chocolate, so she chopped up a bar of semi-sweet chocolate instead, assuming it would melt into the dough. It didn’t. Instead, it held its shape, and the chocolate chip cookie was born entirely by accident.
Nestlé eventually bought the rights to print her recipe on their chocolate chip bags, and it has barely changed since. That’s not marketing spin, either. If you compare an old package to a new one, the ratios are nearly identical. It’s one of the rare recipes that earned its place through decades of home bakers proving, batch after batch, that it simply works.
Step-by-Step: How to Make Toll House Cookies
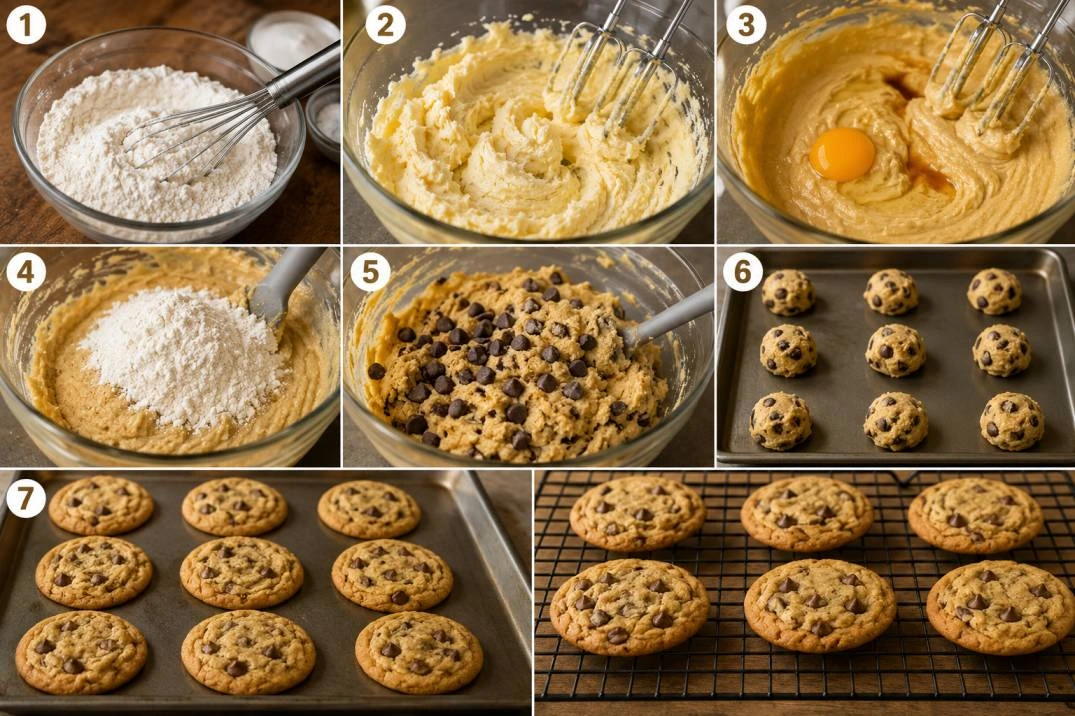
Step 1: Prep Your Oven and Dry Ingredients
Preheat your oven to 375°F (190°C). In a small bowl, combine the flour, baking soda, and salt by whisking them together, then place the mixture to the side. This step feels unnecessary until the one time you forget the baking soda entirely and wonder why your cookies came out flat and dense.
Step 2: Cream the Butter and Sugars
In a large bowl, beat the softened butter with both sugars until the mixture is light, fluffy, and noticeably paler than when you started. This usually takes two to three minutes with an electric mixer. Don’t rush this part. Creaming properly is what traps air in the dough, and that air is what gives your cookies lift and a tender bite.
Step 3: Add the Vanilla and Eggs
Incorporate the vanilla extract, then add the eggs individually, stirring thoroughly after each addition. The batter should look smooth and slightly glossy at this point, almost like a thick buttercream.
Step 4: Bring in the Dry Ingredients
Slowly incorporate the flour mixture into the wet ingredients. Mix until the flour streaks are no longer visible.. Overmixing here develops the gluten in the flour, and too much gluten is exactly what makes cookies tough and bread-like instead of tender.
Step 5: Fold in the Chocolate Chips
Add the chocolate chips (and nuts, if desired) to the mixture and combine by stirring. Folding rather than beating keeps the chips whole and evenly distributed instead of crushed throughout the dough.
Step 6: Portion and Bake
Drop rounded tablespoons of dough onto an ungreased baking sheet, spacing them about two inches apart to allow for spreading. Bake for 9 to 11 minutes, until the edges are golden brown but the centers still look slightly underdone and soft.
Step 7: Cool on the Pan First
This is the step almost everyone skips. Let the cookies sit on the baking sheet for two minutes before moving them to a wire rack. They’re still cooking from residual heat, and this short rest is what turns a soft, fragile cookie into one you can actually pick up without it falling apart.
350 or 375? Let’s Settle This
This comes up constantly, and for good reason: the original recipe calls for 375°F, and that’s still the right answer if you’re following it as written. At 375°F, the outside of the cookie sets and browns quickly while the center stays soft, giving you that classic crisp-edge, chewy-middle combination.
That said, if you consistently find your cookies spreading too thin or browning too fast, dropping to 350°F and adding a minute or two to the bake time can give you slightly thicker, more evenly baked cookies. Neither temperature is wrong. It’s really a matter of the texture you personally prefer, and honestly, that’s worth experimenting with once you’ve made the base recipe a few times.
The Ingredients: What You’ll Actually Need
Before we get into method, let’s talk ingredients. This is a butter-based dough, which means the quality and temperature of your butter matters more than almost anything else in this recipe.
The Original Toll House Chocolate Chip Cookies (Easy Beginner Recipe)
Ingredients
Equipment
Chef’s note: “Softened” butter should give slightly when pressed with a finger but not look shiny or greasy. If it’s melting, it’s too warm, and your cookies will spread thin instead of holding their shape.
Getting Soft, Chewy Cookies Every Time
If your cookies keep coming out crisp all the way through, or worse, cakey and dry, here’s what’s usually going on, and how to fix it:
- Use more brown sugar than white. Brown sugar holds moisture thanks to its molasses content, which is a big part of what keeps cookies soft days after baking.
- Don’t overbake. Pull the cookies out when the centers still look slightly underdone. They’ll finish setting on the pan.
- Add one extra egg yolk. This is a trick I use often in professional kitchens. The extra fat and moisture from a yolk (without the extra white, which can dry cookies out) makes a noticeably richer, chewier cookie.
- Chill the dough for 30 minutes. This solidifies the butter again, which slows spreading and gives you a thicker, chewier result.
Frequently Asked Questions
What is the original recipe for Toll House cookies?
The original recipe, created by Ruth Wakefield in the 1930s, is the same one printed on Nestlé Toll House chocolate chip bags today: a butter-based dough with white and brown sugar, eggs, flour, baking soda, and semi-sweet chocolate chips, baked at 375°F. It has remained largely unchanged for nearly a century.
How do I make Toll House cookies soft and chewy?
Use more brown sugar than white sugar, avoid overbaking, and consider adding an extra egg yolk to the dough. Chilling the dough for 30 minutes before baking also helps prevent excess spreading, which keeps the cookies thicker and softer.
Are Toll House cookies baked at 350 or 375 degrees?
The original recipe calls for 375°F, which gives crisp edges and a soft center. Baking at 350°F is a common variation for those who prefer a thicker, more evenly baked cookie, though it requires a slightly longer bake time.
What makes a cookie crispy versus chewy?
It comes down to fat, sugar, and bake time. More butter and white sugar, along with a longer bake time, produce a crispier cookie. More brown sugar, an extra egg yolk, and slightly underbaking the centers produce a chewier, softer texture.
Final Thoughts
There’s a reason this recipe has survived, largely unedited, for almost ninety years: it works, and it rewards attention to small details far more than it demands complicated technique. You don’t need a stand mixer, a pastry background, or a single fancy ingredient to make cookies that taste like they came from a real bakery. You need good butter, a little patience while it creams with sugar, and the discipline to pull the pan out before the cookies look “done.”
That seventeen-year-old version of me eventually figured this out, batch by batch, burnt edge by burnt edge. You don’t have to take the long way. Follow the steps above, trust the process even when the centers look underbaked, and you’ll have a cookie that tastes like it’s been perfected for generations, because it has.
Tried this recipe? I’d love to know how your batch turned out, and whether you went with 350 or 375. Share your results in the comments, or tag your cookie photos so other home bakers can see them. And if you want more chef-tested basics like this one