How to Make Perfectly Crispy Fried Zucchini (No More Soggy Slices!)
Let me be honest with you: the first time I tried to fry zucchini at home, it was a disaster. Pale, limp, oil-soaked rounds that flopped on the plate like little wet sponges. No crunch. No color. No dignity. Sound familiar?
Here’s the thing — fried zucchini is one of those dishes that looks effortlessly simple but has a handful of small traps that catch almost every beginner. The good news? Once you understand why those traps exist, you’ll never fall into them again. This guide will walk you through everything — from picking the right oil to getting that satisfying, golden crunch — step by step.
⚡ Key Takeaways
- Always salt zucchini slices first — this is the single biggest secret to crispiness
- All-purpose flour (or a flour-cornstarch mix) gives you the best crunchy coating
- Use a neutral, high smoke-point oil like vegetable or avocado oil
- Don’t overcrowd the pan — it’s the #1 cause of soggy zucchini
- Baking can work but won’t give you the same crispy result as pan frying
Why Does Zucchini Get Soggy in the First Place?
Before we cook anything, we need to talk about the enemy: water. Zucchini is about 95% water by weight. That’s not a small amount — that’s basically a cucumber wearing a green jacket. When you drop a wet, unprepped slice into hot oil, that water steams the coating from the inside out, turning your crispy dream into a sad, greasy reality.
The fix is simpler than you think, and it starts before you even turn on the stove. Let’s get into it.
🍳 Crispy Pan-Fried Zucchini — Step-by-Step Recipe:

How to Make Perfectly Crispy Fried Zucchini (No More Soggy Slices!)
Ingredients
Equipment
Notes
- Removing moisture is the secret to avoiding soggy zucchini.
- Panko breadcrumbs give extra crunch.
- Do not overcrowd the pan to maintain oil temperature.
- Best served fresh while hot and crispy.
Step-by-Step Instructions:
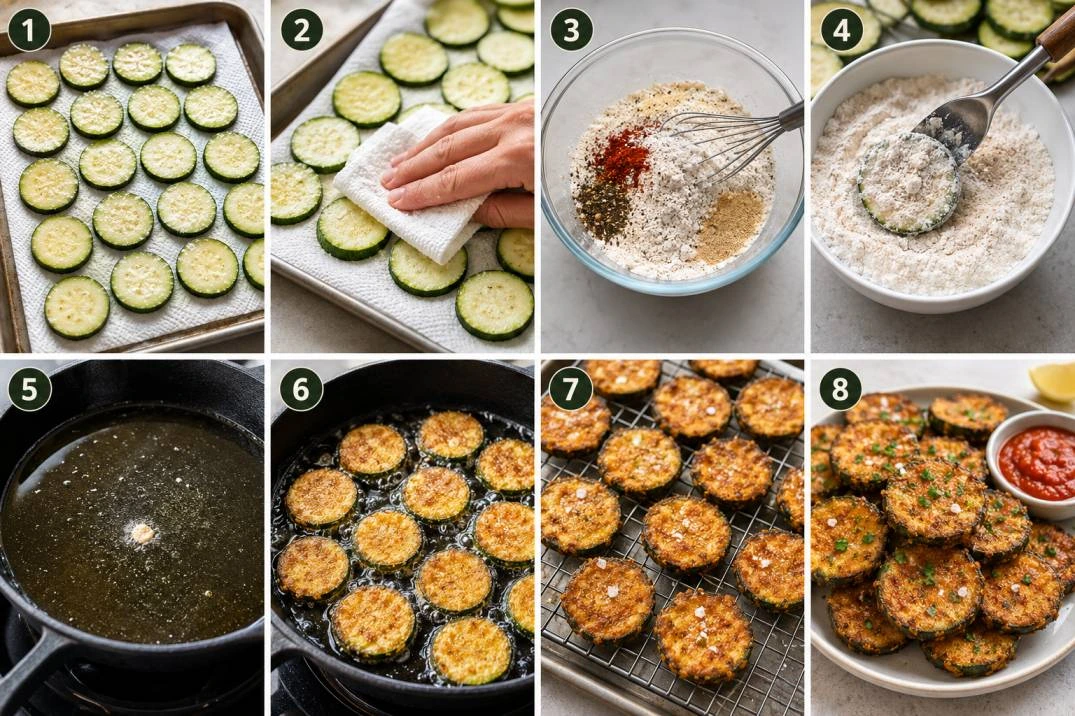
Slice and salt your zucchini
Cut your zucchini into uniform ¼-inch rounds. Lay them out on a paper towel-lined baking sheet and sprinkle both sides generously with kosher salt. Let them sit for 10–15 minutes. You’ll see beads of moisture form on the surface — that’s exactly what you want.Chef’s Note: Don’t skip this step. Salting first is the single most important thing you can do. It draws out moisture before it hits the pan, which is the difference between crispy and mushy.
Pat the slices completely dry
After resting, use a clean paper towel to press firmly on each slice. Remove every drop of moisture you can see. The drier the surface, the better the coating will stick and the crispier the result will be.
Mix your coating
In a shallow bowl, whisk together the flour, cornstarch, garlic powder, black pepper, paprika, and onion powder. This seasoned flour is your flavor base and your crunch layer — don’t be shy with the spices.Chef’s Note: The cornstarch is your secret weapon here. It forms a lighter, crispier crust than flour alone. Think of it like the technique behind great Chinese-style frying.
Coat the zucchini
Dredge each slice in the flour mixture, pressing gently so the coating adheres to both sides. Shake off any excess — a light, even coat is what you’re after, not a thick, clumpy layer. For extra crunch, dip in beaten egg first, then dredge in flour.
Heat your oil properly.
Pour your oil into a large, heavy skillet (cast iron is ideal) until it’s about ¼ inch deep. Heat over medium-high until the oil reaches 350–375°F. No thermometer? Drop a tiny pinch of flour in — if it sizzles immediately and floats up, you’re ready.Chef’s Note: Cold oil is another major cause of sogginess. The zucchini needs to hit hot oil so the coating sets quickly and seals the surface before any steam can build up inside.
Fry in batches — do not crowd the pan
Working in small batches, lay the zucchini rounds in a single layer with space between each piece. Cook each side for 2 to 3 minutes until the surface turns a deep golden brown color. Resist the urge to move them too early; let the crust form.Chef’s Note: Overcrowding drops the oil temperature and traps steam between the pieces. One common reason home cooks end up with soft, oily zucchini instead of crispy rounds. Be patient — fry in two or three batches if needed.
Drain and finish
Place the fried zucchini on a wire rack that is positioned over a baking sheet. A wire rack is preferable to paper towels because it allows air to flow underneath and prevents the bottom from becoming steamed. Add flaky sea salt to the surface while it is still hot.
Serve right away
Fried zucchini is best eaten within 10 minutes of coming out of the pan. Serve with marinara, tzatziki, or a simple squeeze of lemon and a shower of fresh parsley.
The Best Seasonings for Fried Zucchini
The base recipe above is your blank canvas. From there, you can go in a dozen directions depending on your mood. If you want Italian vibes, add dried oregano and a little Parmesan right into the flour mixture. Going for something with a bit of heat? A pinch of cayenne and smoked paprika does the trick. I personally love a dash of cumin in the coating — it adds this warm, earthy quality that pairs beautifully with a yogurt dipping sauce.
The one rule I hold firm on: always finish with flaky salt when the zucchini is still piping hot. The heat opens the crust just enough to let those salt crystals settle in. It’s a small thing that makes a huge difference.
Fry vs. Bake: Which Is Actually Better?
I get this question constantly, and I’ll give you the honest answer: it depends on what you’re after. If crispy is your goal — true, shatteringly crispy — pan frying wins every single time. The direct contact with hot oil creates a Maillard reaction (that beautiful browning process) that an oven simply cannot replicate.
That said, baking at high heat (425°F or above) with a light coating of oil is a completely respectable option. You’ll get golden color and a pleasant texture, just not the same deep crunch. It’s also far more forgiving — harder to overcook, easier to do in bulk. So if you’re cooking for a crowd and don’t want to stand at the stove for 30 minutes, the oven is your friend. If you’re cooking for yourself on a Tuesday night and you want something that feels like a treat? Get that pan out.
Frequently Asked Questions
Do I need to salt zucchini before frying?
Yes — and this is non-negotiable if you want crispy results. Zucchini has a very high water content, and that moisture is what causes sogginess. Salting the slices 10–15 minutes before cooking draws out that water through osmosis. After salting, you’ll see actual liquid beading on the surface. Pat everything completely dry before coating, and you’ll have a much better foundation for a crispy crust. This step is frequently overlooked by beginners, and doing so represents a common mistake in the learning process.
What is the best oil for frying zucchini?
You want a neutral-flavored oil with a high smoke point — something that won’t burn at frying temperatures (around 350–375°F) or add its own strong flavor to the dish. Vegetable oil, canola oil, and avocado oil are all excellent choices. Avocado oil is my personal favorite because it has a very high smoke point and a clean, neutral taste. Avoid extra virgin olive oil for frying — it has a low smoke point and a strong flavor that can overpower the zucchini. Regular (light) olive oil is fine in a pinch.
What flour is best for frying zucchini?
All-purpose flour is the most reliable and accessible choice, and it gives you a solid, golden crust. For extra crispiness, mix in about 25–30% cornstarch — this reduces the gluten that can make the coating chewy and creates a lighter, crunchier texture instead. If you want to go gluten-free, rice flour is an excellent substitute and actually fries up beautifully. Some Southern-style recipes use seasoned cornmeal, which gives a coarser, crunchier bite that holds up well even after a few minutes on the plate.
How do you pan fry zucchini without it getting soggy?
There are four things you need to get right: salt and dry the zucchini thoroughly before coating, use a flour-cornstarch mixture for the coating, make sure your oil is hot enough before you add the zucchini (around 350–375°F), and never overcrowd the pan. Each of these points matters. If the oil isn’t hot enough, the coating absorbs oil instead of crisping up. When too many items are placed in the pan, the temperature decreases and steam becomes trapped between the pieces, which can soften them.. Fry in small batches, drain on a wire rack (not paper towels), and serve immediately.
A Quick Note Before You Start
Fried zucchini isn’t complicated, but it rewards a little patience and attention. Rushing the salting step, skipping the dry-off, or cramming too many slices into the pan at once — these are the small choices that separate a plate of golden, crispy rounds from a pile of greasy disappointment.
Give yourself the time to do each step properly the first time through, and I promise you’ll wonder why you ever struggled with this dish. When you have mastered the technique, it becomes an automatic process. You’ll find yourself doing it on weeknights without even thinking about it.
Tried This Recipe?
Drop a comment below and tell us how it turned out — or share your favorite dipping sauce. We’d love to know what’s in your kitchen.