The Chef’s Guide to Shrimp Cocktail That Actually Tastes Like a Restaurant Made It
The first time I plated shrimp cocktail for a paying table, I was twenty-two, terrified, and absolutely certain I was going to overcook the shrimp. My chef at the time observed me standing over the pot with an intense focus, then shared advice that I continue to pass on to every home cook who seeks my guidance. about this dish: ” Shrimp cocktail isn’t hard. It’s just unforgiving.” Get the timing right and you’ll have plump, sweet, snappy shrimp that disappear off the platter in minutes. Get it wrong by even sixty seconds, and you’ve got rubber bands with tails.
Here’s the good news: once you understand the two or three things that actually matter, shrimp cocktail becomes one of the easiest impressive dishes you can put on a table. No stove-side babysitting, no fancy equipment, no culinary school required. Just a pot, a timer, and a little patience while it chills.
Quick Takeaways Before You Start
- The shrimp is the star — spend your money there, not on the sauce.
- Cooking time is measured in seconds, not minutes. Overcooking is the single most common mistake home cooks make.
- An ice bath isn’t optional. It’s what keeps the shrimp from turning to rubber.
- Cocktail sauce should be homemade — it takes five minutes and tastes nothing like the bottled version.
- Shrimp cocktail is always served cold, and it should never sit out longer than two hours.
What Actually Goes Into a Great Shrimp Cocktail
Strip this dish down to its studs and you’ve got exactly three components: the shrimp, the sauce, and the ice. That’s it. There’s no hidden technique, no secret ingredient list a mile long. This is precisely why the details that you are able to control are so important..
Start with the shrimp itself. Size matters more than people expect — you want “jumbo” or “extra-large,” which usually shows up on the bag as a count like 16/20 or 21/25 (that number tells you roughly how many shrimp make up a pound). Bigger shrimp are more forgiving to cook and look far more impressive curled around the rim of a glass. I’ll let you in on something most home cooks don’t realize: buying it frozen is almost always the smarter move. Shrimp is flash-frozen at sea within hours of being caught, so unless you live on the coast, that “fresh” shrimp sitting in the seafood case has usually just been thawed out for you already — you’re paying more for shrimp that’s already lost a little quality, not gained any.
Then there’s the sauce. A classic cocktail sauce is nothing more than ketchup, a generous spoonful of prepared horseradish, a squeeze of fresh lemon, a dash of Worcestershire sauce, and a few drops of hot sauce if you like a kick. Stir it together, taste, adjust. That’s the whole recipe, and it will run circles around anything from a jar.
Finally, don’t skimp on ice. It does double duty — it stops the cooking the moment the shrimp comes out of the pot, and it keeps the finished dish cold and safe while it sits on your table.
Boiling or Steaming: Which One Actually Wins?
You’ll find passionate opinions on both sides of this debate, but here’s my honest take after years of cooking both ways: boiling (or more precisely, poaching) gives you more control, and control is what you want with an ingredient this easy to ruin. Steaming can work beautifully, but it’s easier to lose track of exactly when the shrimp is done, and with shrimp, “exactly when” is the whole ballgame.
When you boil, you’re not actually keeping the pot at a rolling boil the whole time — you bring the water up to a boil, add the shrimp, and often pull the pot off the heat entirely, letting the residual heat finish the job gently. A single technique can determine whether shrimp turns out tender or becomes chewy.
The Step-by-Step Recipe:
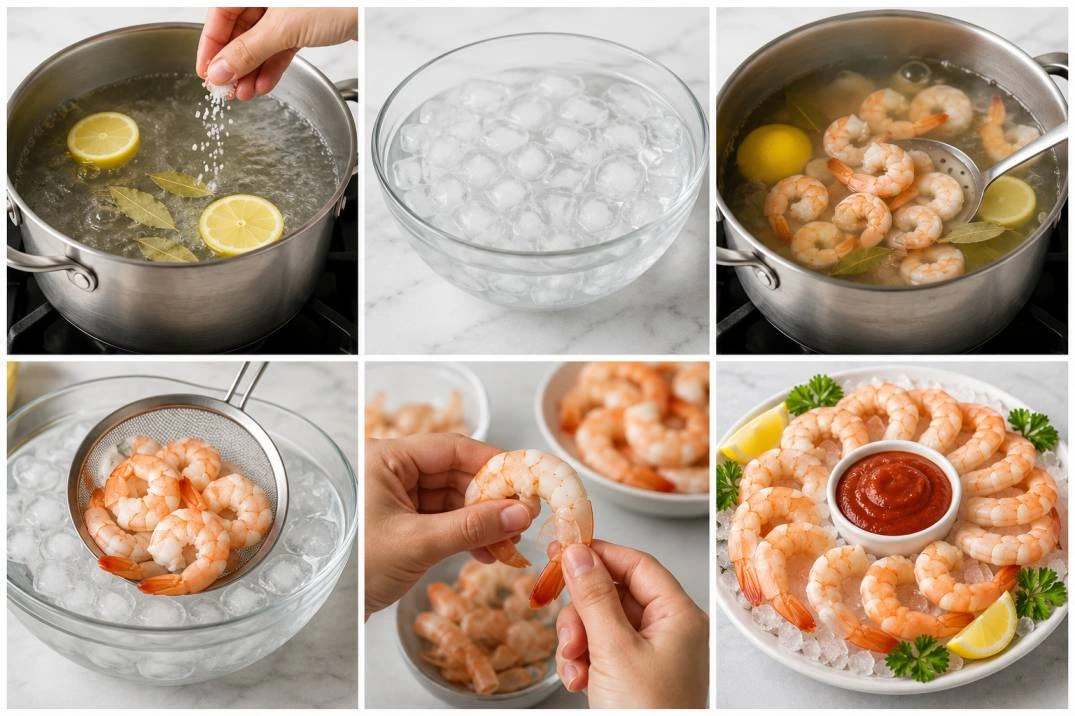
Step 1 — Build your flavorful poaching liquid
Fill a large pot about two-thirds full with water. Squeeze in the lemon halves and drop them in, add the bay leaves and salt, and bring it to a rolling boil. This step matters more than people think — plain water gives you plain shrimp.
Step 2 — Prep your ice bath while you wait
Fill a large bowl with ice and cold water and set it right next to the stove. You want it ready to go the instant the shrimp comes out, not scrambled together afterward.
Step 3 — Cook the shrimp, and watch the clock closely
Add the shrimp to the boiling water, give it a stir, and then either kill the heat or drop it to a bare simmer. Depending on size, they’ll need somewhere between two and four minutes — jumbo shrimp typically land around three to three and a half. You’ll know they’re done when they turn pink and opaque and curl into a loose “C” shape. If they’ve curled into a tight “O,” you’ve gone too far.
Step 4 — Shock them immediately
Drain the shrimp and plunge them straight into the ice bath. Let them sit until fully chilled, about ten to fifteen minutes. This is the step people rush, and it’s the one that determines whether your shrimp is tender or tough.
Step 5 — Peel and chill
Once cold, peel the shrimp, leaving the tails on for easy dipping if you like the presentation. Cooking and peeling can be done up to a day ahead — just keep the shrimp covered in the coldest part of your fridge and hold off on adding the sauce until serving time.
Step 6 — Plate and serve
Arrange the shrimp around a bowl of cocktail sauce, ideally nested in a larger bowl of crushed ice to keep everything cold. Garnish with a lemon wedge, and you’re done.
Serving It Like You Know What You’re Doing
Shrimp cocktail is always served cold — there’s no version of this dish that comes out hot. But “cold” needs to be more than a starting temperature; it needs to stay that way. Seafood is one of the more perishable things you’ll put on a buffet table, and food safety guidelines are clear that it shouldn’t sit out at room temperature for more than two hours, or one hour if you’re outdoors on a hot day. The easiest fix is the same trick restaurants use: nest your serving bowl inside a larger bowl packed with ice, and swap the ice out as it melts. It looks polished and it keeps your guests safe, which is really the whole point of hosting in the first place.
This makes enough for a party of four to six as an appetizer. Scale it up freely — the method doesn’t change no matter how much you’re cooking.
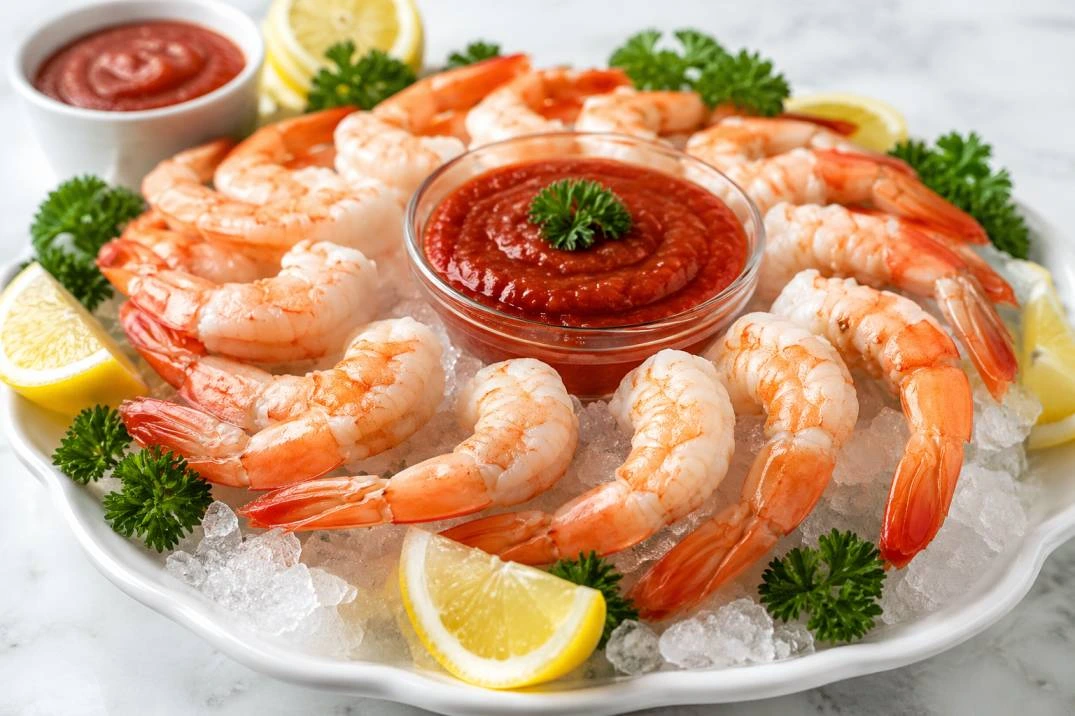
Classic Shrimp Cocktail with Homemade Cocktail Sauce (Restaurant-Style)
Ingredients
Frequently Asked Questions
What goes into a shrimp cocktail?
Just three things, really: quality jumbo shrimp, a simple ketchup-and-horseradish cocktail sauce, and plenty of ice for both cooking and serving. Everything else — lemon wedges, fresh herbs, a fancy glass — is presentation, not necessity.
Which method is preferable for cooking shrimp for shrimp cocktail: boiling or steaming?
Boiling (technically more of a gentle poach) gives you tighter control over doneness, which is exactly what you want with an ingredient that goes from perfect to overcooked in under a minute. Steaming can work, but it’s harder to judge visually, so I recommend it mainly once you’ve got a feel for the timing.
How long do you boil shrimp for cocktail?
Two to four minutes, depending on size — jumbo shrimp usually need right around three to three and a half minutes. Pull them the moment they turn pink and opaque and curl into a “C” shape, then get them into an ice bath immediately.
Is shrimp cocktail served hot or cold?
Cold, always. It should be chilled through before serving and kept cold throughout — ideally at or below 40°F — and it shouldn’t sit out for more than two hours to stay safe to eat.
Give It a Try This Weekend
Shrimp cocktail earns its place as a classic for a reason — it’s genuinely hard to mess up once you understand the timing, and it makes you look like you know exactly what you’re doing in the kitchen. Pick up a bag of jumbo shrimp, set a timer you trust, and don’t skip the ice bath. That’s really the whole secret.
Made it? I’d love to hear how it turned out — drop a comment below with what you served alongside it, and tell me whether you went classic cocktail sauce or put your own spin on it.