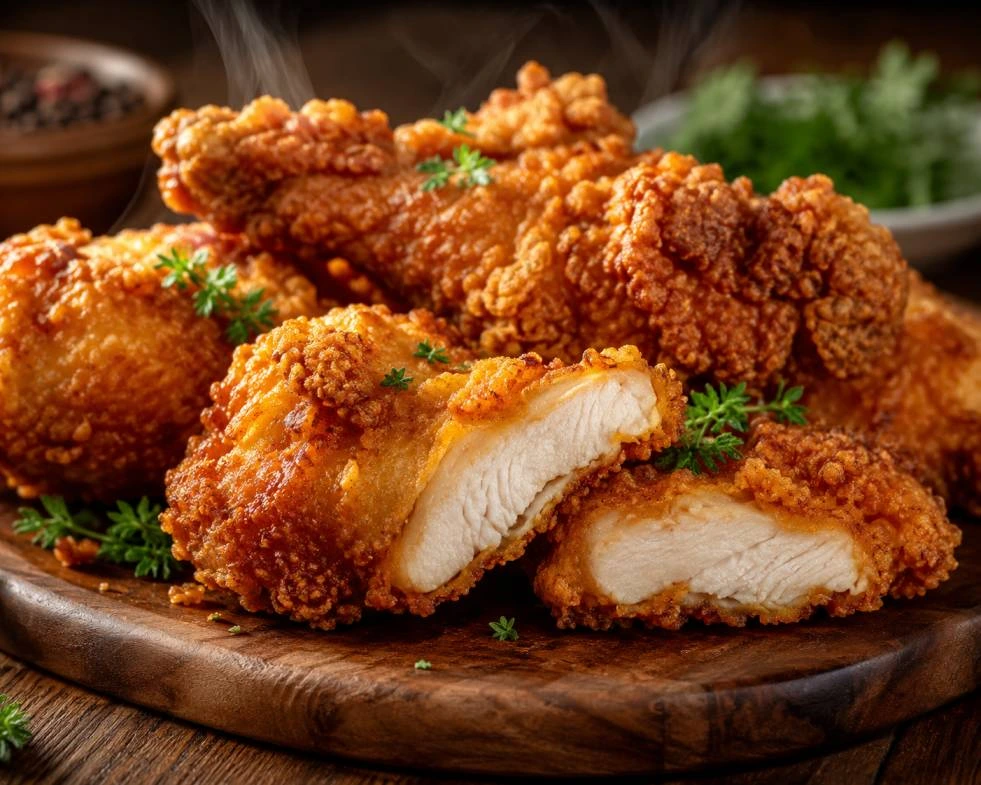
How to Make Perfectly Crispy Chicken at Home — Chef’s Secrets, Finally Revealed
No mystery. No guesswork. Just the techniques professional kitchens use every single day — explained simply for the home cook.
🍗The Beginner’s Perfect Crispy Chicken Recipe:
Perfect Crispy Chicken at Home (Chef’s Secret Method)
Ingredients
Notes
⚡ Key Takeaways Before We Start
- Cornstarch (not just flour) is the #1 secret behind an ultra-crispy crust
- You always dip in egg after the first flour coat — the order matters enormously
- Baking powder in your dredge creates microscopic bubbles that add serious crunch
- Oil temperature is everything — too low and you get grease, too high and you get char
- Oven crispy chicken is possible, but needs a specific technique to get truly crunchy skin
Let me tell you something I see happen all the time. Someone pulls a batch of chicken out of the oil — golden on the outside, hopeful in the heart — takes one bite, and the crust slides right off. The chicken underneath is fine. But that crunch? Gone. Disappointing doesn’t even cover it.
After years working professional kitchens, I can tell you with absolute confidence: crispy chicken is not a talent. It’s a technique. And once you understand the handful of decisions that actually matter, you will never end up with sad, soggy chicken again.
This guide walks you through everything — from the flour vs. cornstarch debate, to the egg dipping order, to what restaurants do differently that home cooks almost never know about. We’ll also include a step-by-step recipe you can follow tonight, plus answers to the most common questions beginners ask.
The Real Reason Your Chicken Isn’t Crispy (It’s Not What You Think)
Most beginner cooks believe that achieving crispy chicken primarily depends on frying time, thinking that leaving it in the oil longer will result in a crispier exterior. But here’s the truth that changes everything: crispiness comes from moisture management, not just heat.
Chicken skin and meat naturally contain a lot of water. When that moisture hits hot oil, it turns to steam — and steam is the enemy of a crunchy crust. The goal of every technique in this guide is to either remove that moisture before frying, or create a barrier that stops it from destroying your crust.
Once you start thinking about it that way, all the “chef secrets” suddenly make perfect sense.
Flour vs. Cornstarch: Which One Actually Wins?
This is the most common question I get from home cooks, and honestly — it’s a trick question. The answer is both, used together.
All-purpose flour gives your coating structure and a golden color. But on its own, flour can turn thick and pasty when it hits steam. Cornstarch, on the other hand, has a much finer texture and creates those shatteringly thin, crispy layers you see in great fried chicken. When you combine them — roughly 3 parts flour to 1 part cornstarch — you get the best of both worlds.
This is exactly how Chinese restaurants achieve that famously light, incredibly crispy coating on their fried chicken. The cornstarch ratio is their not-so-secret weapon.
Add 1 teaspoon of baking powder per cup of your flour-cornstarch mix. It sounds strange, but it creates tiny air bubbles in the coating as it fries, giving you an almost lace-like crunch that’s impossible to get otherwise.
The Egg & Flour Order — Yes, It Absolutely Matters
Here’s where a lot of beginners go wrong. They dip the chicken in egg first, then coat it in flour. And while that does work, you’re leaving crispiness on the table.
The professional method is: flour first, then egg, then flour again (or breadcrumbs for a different texture). That initial flour coat gives the egg something to grip onto, which means your final crust bonds to the chicken instead of sliding off the moment you cut into it.
Think of it like painting a wall. You wouldn’t skip the primer coat and go straight to paint — the primer is what makes everything else stick.
Step-by-Step Instructions:
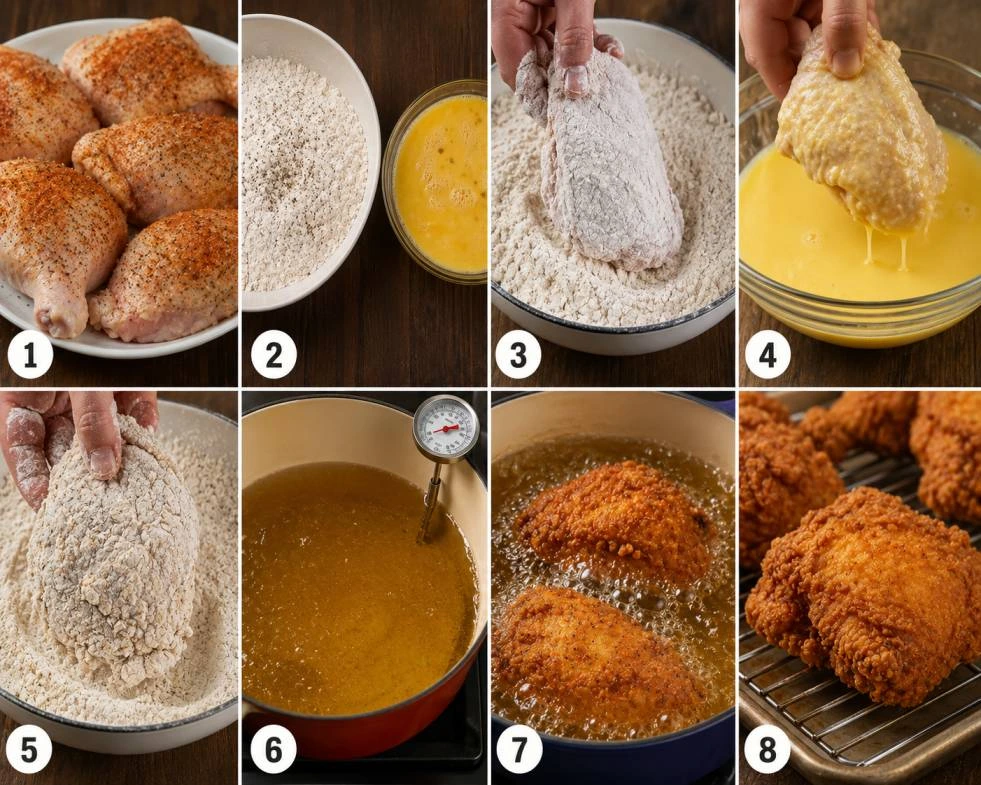
Season the chicken.
Pat your chicken pieces completely dry with paper towels — this step alone makes a bigger difference than most people realize. Season all over with salt, pepper, garlic powder, and paprika. Let it sit at room temperature for 10 minutes while you prepare everything else.
Mix your dredge.
In a wide shallow bowl or plate, whisk together the flour, cornstarch, baking powder, salt, pepper, and onion powder until evenly combined. In a separate bowl, beat the eggs with the buttermilk until smooth.
Do the first flour coat.
Press each chicken piece firmly into the flour mixture, coating all sides completely. Shake off any excess — you want a thin, even layer, not clumps. Set aside on a clean plate.
Dip into the egg wash
Take each flour-coated piece and dip it into the egg mixture, letting the excess drip off. This egg layer is the glue that bonds your final crust to the chicken
Do the second flour coat
Press each egg-coated piece back into the flour mixture. This time, press firmly and hold for a few seconds to help the coating adhere. You’ll notice the coating start to look shaggy and textured — that’s exactly what you want. Those little ridges fry up into incredible crunch.
Heat your oil
Pour oil into a heavy-bottomed pot or deep skillet until it’s about 2 inches deep. Heat over medium-high to 350°F (175°C). If you don’t have a thermometer, drop a pinch of flour in — it should sizzle immediately but not burn. Getting this temperature right is non-negotiable.
Fry in batches — don’t crowd the pan
Gently lower 2 pieces of chicken into the oil at a time. Overcrowding drops the oil temperature dramatically, which leads to greasy, soft chicken. Fry for 8–10 minutes per side, or until deep golden brown and cooked through (internal temperature of 165°F / 74°C).
Rest on a wire rack, not paper towels
Transfer the fried chicken to a wire rack set over a baking sheet. Paper towels trap steam underneath and soften your crust — a wire rack lets air circulate all around, keeping every surface crispy.
What If You Want Crispy Chicken From the Oven?
Good news: you absolutely can get genuinely crispy chicken without a drop of frying oil. But you have to commit to the technique, because a half-hearted approach gives you rubbery skin that nobody wants.
The keys are: very high heat (425°F / 220°C or higher), a wire rack so air can circulate underneath, and a light coating of oil or cooking spray on the surface before it goes in. Baking powder in your seasoning rub also helps dramatically — it reacts with the chicken skin and creates that blistered, crackly texture you’re after.
Budget about 35–45 minutes for bone-in pieces, and resist the urge to flip too early. Let the bottom side really set before you turn it.
For extra-crispy oven chicken, air-dry the seasoned pieces uncovered in the fridge for at least 1 hour (or overnight). The drier the skin going in, the crispier it comes out. Professional kitchens do this routinely — it’s one of those simple steps that makes a huge difference.
Frequently Asked Questions
The questions beginners ask most — answered honestly, without jargon.
When frying chicken, do you dip it in egg or flour first?
Always flour first, then egg, then flour again. The initial flour coat gives the egg wash something to grip, which means your crust actually bonds to the chicken instead of peeling off. Skipping this step is one of the most common beginner mistakes — and one of the easiest to fix.
What makes chicken crispier — flour or cornstarch?
Neither alone — a combination of both gives you the best result. Flour provides structure and golden color, while cornstarch creates a thinner, lighter crust that shatters when you bite into it. The ratio that is most effective for many cooks is three parts flour to one part cornstarch. This is the same approach used in Chinese-style crispy chicken, which is famous for its incredibly light coating.
Should I use baking soda or baking powder to make chicken crispy?
Use baking powder, not baking soda. Baking powder is slightly alkaline and reacts with the proteins in chicken skin (or your dredge coating) to create tiny bubbles as it cooks — those bubbles are what produce that ultra-crunchy, almost lacey texture. Baking soda is much more powerful and can leave a metallic or soapy flavor if you’re not careful. Stick to baking powder: about 1 teaspoon per cup of your flour mixture is all you need.
How do restaurants get their chicken skin so crispy?
There are a few things restaurant kitchens do that most home cooks don’t: they dry the chicken thoroughly before cooking (often air-drying overnight), they use higher oil temperatures with better heat retention (cast iron or commercial fryers), and they almost always use a cornstarch-flour blend rather than plain flour. Many also brine or marinate their chicken beforehand, which adds flavor depth without adding extra moisture at the surface. The good news? Every single one of these techniques is completely doable at home.
The Bottom Line: Crispy Chicken Is a Learnable Skill
Here’s what I want you to walk away with: crispy chicken is not some mysterious restaurant magic that you can’t recreate at home. It’s a series of small, deliberate decisions — dry your chicken, use cornstarch in your dredge, get your oil to the right temperature, and rest it on a wire rack. Do those four things and you will have genuinely great crispy chicken, every time.
Start with this recipe exactly as written. Once you have prepared it once or twice and feel at ease, that is when you can begin to experiment with different spice blends, various oils, and the addition of a bit of hot sauce. your egg wash. The technique stays the same; the flavors are yours to play with.
That’s the beauty of learning to cook properly. Once the foundation is solid, everything else becomes creative.
Ready to Try It Tonight?
Save this recipe and share it with someone who’s been struggling to get that perfect crunch. Questions as you cook? Please share your thoughts in the comments; I read each one.